
By Marcus A. Hale • Published June 9, 2026 • Last updated: June 9, 2026
Most beginners skip the fundamentals and jump straight into complex subjects. That is why their drawings feel flat, proportions look wrong, and lines feel shaky. The truth is simple: a few core techniques, practiced consistently, will fix most of these problems before they start.
I spent my first two years of drawing making exactly this mistake. I tried portraits before I could draw a clean circle. I attempted perspective without understanding how lines converge. The result was frustration, not progress. Once I went back to basics, everything changed.
This guide covers the five techniques that actually matter when you are starting from zero. No shortcuts, no talent required.
1. Line Control: The Foundation of Every Drawing
Before you draw objects, faces, or scenes, you need to control your line. A confident line is smooth, intentional, and consistent in pressure. A weak line is scratchy, hesitant, and overworked.
Practice this daily: draw straight lines across your page without lifting your pencil. Then curves, then circles, then ellipses. Do not aim for perfection. Aim for one clean pass. If your line wobbles, slow down. If it fades, press more evenly. If it overshoots, plan your start and stop points before you move.
Common mistake: Drawing short, overlapping strokes to create one line. This creates a fuzzy, uncertain edge. Instead, use your shoulder, not just your wrist, and draw the full line in one motion.
On paper, use a smooth sketchbook and a graphite pencil between HB and 2B. On a digital drawing tablet, adjust your pen pressure curve so light strokes are visible and heavy strokes are dark without maxing out.
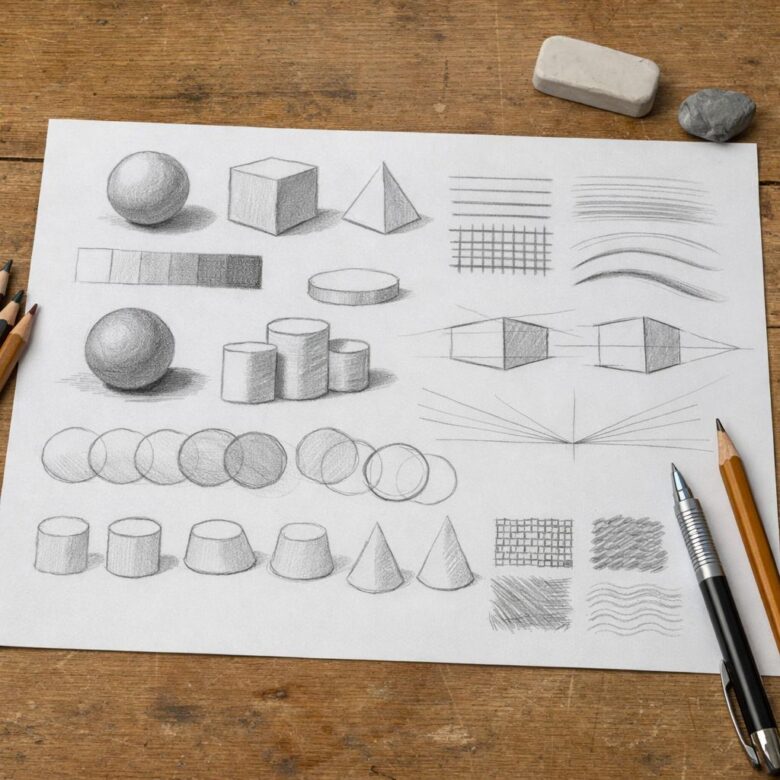
2. Shape Simplification: Seeing Forms, Not Details
Every complex object is a combination of simple shapes. A coffee mug is a cylinder. A phone is a rectangle. A human head is an egg-shaped sphere. Beginners fail because they draw details before they establish the underlying structure.
Train yourself to see the simple form first. Look at any object and ask: what is the basic shape? Then draw that shape lightly. Only after the proportions feel right should you add details like buttons, handles, or facial features.
Exercise: Place five random objects on your desk. Sketch each one in 30 seconds using only basic shapes. No details allowed. Do this for a week and your eye for structure will improve dramatically.
3. Proportion and Measuring: Drawing What You Actually See
Proportion is the relationship between sizes. How wide is the mug compared to its height? How long is the arm compared to the torso? Beginners guess. Artists measure.
Use your pencil as a measuring tool. Hold it at arm’s length, align it with one edge of your subject, mark the length with your thumb, then compare it to another edge. This takes seconds and prevents the most common beginner error: drawing one part too big and another too small.
Another method is negative space drawing. Instead of drawing the object, draw the empty space around it. This forces your brain to see shapes rather than symbols. For example, most beginners draw an eye as a football shape because that is what they think an eye looks like. Drawing the negative space around the eye forces them to look at the actual shape.
4. Value and Shading: Creating the Illusion of Light
Value is how light or dark something is. Without value, every drawing is a flat outline. With value, objects gain weight, depth, and form.
Start with a simple value scale. Draw five boxes in a row, from white to black. Then apply this scale to a basic object under a single light source. Identify five areas: highlight (lightest), midtone, core shadow, reflected light, and cast shadow.
Common mistake: Blending too early. Beginners often smudge graphite or digital paint before they have placed the correct values. The result is muddy gray instead of clear light and shadow. Place your values first. Blend only if necessary.
On paper, use the side of your pencil for broad value areas and the tip for edges. On a digital drawing tablet, use a soft round brush at low opacity and build up layers.
5. Perspective: Making Objects Sit in Space
Perspective is how objects appear smaller as they move farther away. One-point perspective uses a single vanishing point on the horizon. Two-point perspective uses two. Three-point adds a vertical vanishing point for dramatic angles.
Beginners should start with one-point perspective. Draw a horizon line. Place one vanishing point. Draw a square facing you, then draw lines from each corner to the vanishing point. That is a box in perspective. Every room, building, and street scene is just a variation of this principle.
Exercise: Draw your room corner in one-point perspective. Do not worry about accuracy. Worry about understanding where the back wall sits, where the floor meets the ceiling, and how furniture aligns with the vanishing point.
How to Practice These Techniques Without Overwhelming Yourself
Do not try to master all five at once. Choose one technique per week. Spend 15 minutes daily on exercises specific to that technique. At the end of five weeks, you will have a solid foundation that most beginners skip entirely.
Keep your materials simple. A sketchbook, a few graphite pencils, and an eraser are enough. If you work digitally, a basic drawing tablet and free software like Krita will handle everything in this guide.
Track your progress by redrawing the same subject every two weeks. The improvement will be visible, and that visibility is what keeps motivation alive.
Related: How to Improve Your Sketching Skills with Simple Daily Habits
Marcus A. Hale is a self-taught digital illustrator based in Brazil with 6+ years of hands-on experience. He founded Drawinglics to document honest, tested advice for beginners.

Marcus Hale is a self-taught digital illustrator and art enthusiast with 6+ years of hands-on experience with Procreate, Photoshop, and Krita. He started sketching in school notebooks and transitioned to digital art in 2019, testing dozens of tablets, software, and techniques along the way. At Drawinglics, he shares what he learned through practice — no promises of natural talent, just real tests, documented mistakes, and processes that actually work for beginners starting from scratch. When he is not testing new brushes or setting up tablets.